
Note: This is a continuation of the future web apps series, I started some days ago and this is the second part of the series. You can check out the first one here .
Content:
- Introduction
- Writing Serializers
- Writing Views
First, let’s explain some terms. REST stands for Representational State Transfer and it is a software architectural design. The API stands for Application Programming Interface; it is an application interface that we interact with programmatically and its based on request and response.
And generally when you see the word RESTful API, you should know that we are talking about Web Services or Web APIs. It’s like a method expose parts of your application to third-parties i.e external applications and Websites. Its usually data-oriented and like I said earlier, it deals with request and response.
The good thing about RESTful API is that it can be used by any application built with any language on any platform. As long as the language has support for HTTP, then you are good to go.
So in this tutorial, we will learn how to build a Ticket App Rest API with Python/Django using best practices. Django is one of the best framework you could use to build Web App quickly and easily which includes Rest API supports.
Since Django was built basically for Web Apps, it’ll be time consuming and slightly difficult to build a standard Web APIs endpoint quickly, so we will be using Django Rest Framework; a Django framework specially built for Rest API.
Django Rest Framework (DRF) is a powerful Django framework for building web APIs. It’s very easy to build model-backed APIs that have authentication, viewset, session and other batteries included.
Why I Chose DRF?
- Authentication — It is the best from basic and session-based authentication to token-based and Oauth2 capabilities.
- Serialization — It has support for both ORM and Non-ORM data sources and seemlessly integrates with any database.
- Viewsets — It has support for viewsets which can replace the Django normal views.
- Good Documentation — If you get stuck somewhere, you can refer to it’s vast online documentation.
- Large Community: The community behind it is quite large and has great community support.
About the Ticket App
Like I have said, we are going to build an endpoint for a ticket app. When I say tickets app, it is not about event tickets, sport ticket or any tickets. It is about users’ complaints ticket over issues they are unable to solve.
The users can create ticket, edit ticket and delete tickets. Also, there is the admin users that attend to the tickets created. They have some level of control over users tickets. They can approve, delete and close a ticket.
The Rest API Structure
The first step in creating the API, is to define the endpoints (or data) we want to expose. Our ticket app will allow users to perform CRUD operations on their tickets.
The endpoints we’ll need are:
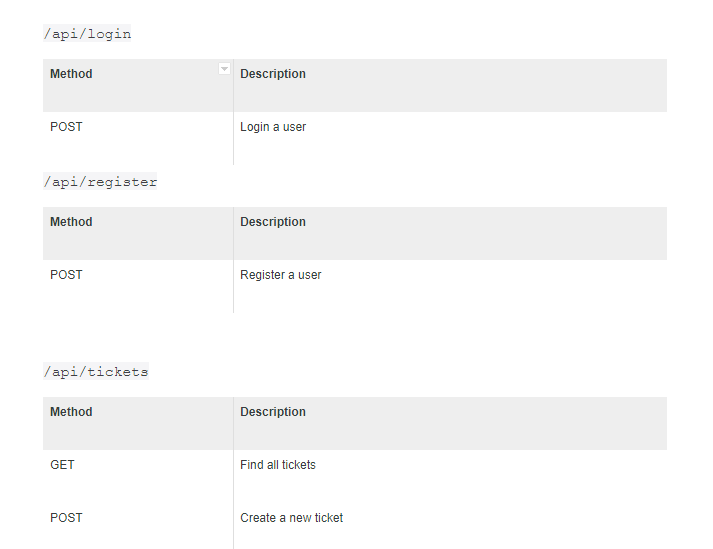
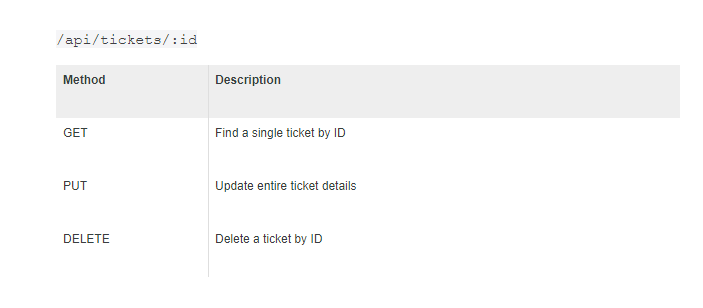
We’ve only listed the basic endpoints we’ll be working on for now and you can checkout all the endpoints we are going to use here.
Creating our Django App
By now you should have Python and Django installed. If you don’t, here’s a good place to start: https://scotch.io/tutorials/build-your-first-python-and-django-application
Lets start..
The first thing to do is to create a virtual environment for the app:
virtualenv ticketapi
or
python3 -m venv ticketapp
cd ticketapi
source bin\activate
Let’s install the modules we need:
python -m pip install django djangorestframework
Lets create the project and the apps:
django-admin startproject ticketapi
cd ticketapi
python manage.py startapp tickets
You should have folder structure as this image below:
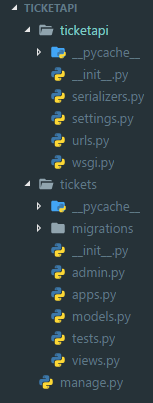
file structure
Settings
We need to do some changes in our settings file. Open the settings.py file:
The first thing is the INSTALLED APPS :
INSTALLED_APPS = [
    'django.contrib.admin',
    'django.contrib.auth',
    'django.contrib.contenttypes',
    'django.contrib.sessions',
    'django.contrib.messages',
    'django.contrib.staticfiles',
    'rest_framework',
    'tickets',
]
You need to add the REST_FRAMEWORK settings. So copy this to your settings file:
REST_FRAMEWORK = {
    _# Use Django's standard `django.contrib.auth` permissions,
    # or allow read-only access for unauthenticated users._ 'DEFAULT_PERMISSION_CLASSES': [
      'rest_framework.permissions.DjangoModelPermissionsOrAnonReadOnly'
    ]
}
Setting up PostgreSQL Database
For our project, we’ll be using the popular PostgreSQL for our database. PostgreSQL is an object-relational database management system with an emphasis on extensibility and standards compliance.
It is one of the best database management system around and its open sourced at that. PostgreSQL has a huge community behind it. Its the best choice for developers around the world.
To get started using Django-PostgreSQL, check this article: https://tutorial-extensions.djangogirls.org/en/optional_postgresql_installation/
You need to install the PostgreSQL python module:
pip install psycopg2
Once you are done setting up PostgreSQL, you need to update your settings.py :
Update the  `DATABASES`  :

DATABASES = {
        'default': {
            'ENGINE': 'django.db.backends.postgresql_psycopg2',
            'NAME': "DB_NAME",
            'USER': "DB_USER",
            'PASSWORD': "DB_PASS",
            'HOST': "DB_HOST",
            'PORT': "DB_PORT",
        }
    }
Once you are done with that, we need to migrate our database:
python manage.py migrate
You can use any database of your choice, just make sure you install and setup the right modules to make it work.
Writing Our Models
The next we need to do is to write our models for the database.
Open the models.py file in the tickets app folder:
from django.db import models
import uuid
from django.contrib.auth.models import User
# Create your models here.

def generate_ticket_id():
    return str(uuid.uuid4()).split("-")[-1] #generate unique ticket id

class Ticket(models.Model):
    title = models.CharField(max_length=255)
    user = models.ForeignKey(User, on_delete=models.CASCADE)
    content = models.TextField()
    category = models.ForeignKey("Category", on_delete=models.CASCADE)
    ticket_id = models.CharField(max_length=255, blank=True)
    created = models.DateTimeField(auto_now=True)
    modified = models.DateTimeField(auto_now_add=True)

    def __str__(self):
        return "{} - {}".format(self.title, self.ticket_id)

    def save(self, *args, **kwargs):
        if len(self.ticket_id.strip(" "))==0:
            self.ticket_id = generate_ticket_id()

        super(Ticket, self).save(*args, **kwargs) # Call the real   save() method

    class Meta:
        ordering = ["-created"]

class Category(models.Model):
    name = models.CharField(max_length=200)
    slug = models.SlugField()

    def __str__(self):
       return self.name
The next thing is to migrate the above models. You can do that by:
python manage.py makemigrations
python manage.py migrate
Writing Serializers
One of the nice features of Django Rest Framework is the ability to create serializers. Serializers allow complex data such as querysets and model instances to be converted to native Python datatypes that can then be easily rendered into JSON , XML or other content types.
In your project roots, create a serializers.py file:
from rest_framework import serializers

from django.contrib.auth.models import User
from tickets.models import Ticket, Category

# Serializers define the API representation.
class UserSerializer(serializers.HyperlinkedModelSerializer):
    class Meta:
        model = User
        fields = ('url', 'username', 'email', 'is_staff')

# Serializers define the API representation.
class TicketSerializer(serializers.HyperlinkedModelSerializer):
    class Meta:
        model = Ticket
        fields = ('id','title', 'ticket_id','user', 'content', 'category','created', 'modified')

# Serializers define the API representation.
class CategorySerializer(serializers.HyperlinkedModelSerializer):
    class Meta:
        model = Category
        fields = ('name', 'slug')
Writing Our Views
Now we need to create our views or basically ViewSet for the serializers. A ViewSet class is simply a type of class-based View, that does not provide any method handlers such as .get() or .post(), and instead provides actions such as .list() and .create()
from django.shortcuts import render
from rest_framework import routers, serializers, viewsets
from ticketapi.serializers import UserSerializer, TicketSerializer, CategorySerializer
from django.contrib.auth.models import User
from tickets.models import Ticket, Category

# Create your views here.

# ViewSets define the view behavior.
class UserViewSet(viewsets.ModelViewSet):
    queryset = User.objects.all()
    serializer_class = UserSerializer

# ViewSets define the view behavior.
class TicketViewSet(viewsets.ModelViewSet):
    queryset = Ticket.objects.all()
    serializer_class = TicketSerializer


# ViewSets define the view behavior.
class CategoryViewSet(viewsets.ModelViewSet):
    queryset = Category.objects.all()
    serializer_class = CategorySerializer
Routing our API
The next thing now is to route our TicketAPI. We’ll be using the routers in Django Rest Framework to register our routes.
Open the urls.py file in your projects root:
»««ticketapi URL Configuration
The urlpatterns list routes URLs to views. For more information please see:
https://docs.djangoproject.com/en/2.0/topics/http/urls/
Examples: Function views 1. Add an import: from my_app import views 2. Add a URL to urlpatterns: path(“, views.home, name=‘home’) Class-based views 1. Add an import: from other_app.views import Home 2. Add a URL to urlpatterns: path(“, Home.as_view(), name=‘home’) Including another URLconf 1. Import the include() function: from django.urls import include, path 2. Add a URL to urlpatterns: path(‘blog/’, include(‘blog.urls’))
from django.contrib import admin
from django.urls import path, include

from django.contrib.auth.models import User
from tickets.models import Ticket, Category
from rest_framework import routers

from tickets.views import UserViewSet, TicketViewSet, CategoryViewSet

# Routers provide an easy way of automatically determining the URL conf.
router = routers.DefaultRouter()
router.register(r'api/users', UserViewSet)

router.register(r'api/tickets', TicketViewSet)

router.register(r'api/category', CategoryViewSet)


# Wire up our API using automatic URL routing.
# Additionally, we include login URLs for the browsable API.
urlpatterns = [
    path('admin/', admin.site.urls),
    path(r'', include(router.urls)),
    path(r'api/', include('rest_framework.urls', namespace='rest_framework'))

]
Running Our TicketAPI
You can run the app by using:
python manage.py runserver 8100
Head over to http://localhost:8100, to check if everything is working fine.

You can now start adding users and tickets either through the links or through the admin panel. You will need admin login in order to do it through the admin panel. Create an admin login by:
python manage.py createsuperuser
Once you are logged into the admin which is http://localhost:8100/admin, you need to update the admin.py file in your tickets app.
Open the admin.py file in your tickets app:
from django.contrib import adminfrom .models import Ticket, Category_# Register your models here._admin.site.register(Ticket)admin.site.register(Category)
Testing our API Endpoints
You can easily test the endpoints we have created with many tools. You can use Postman to do that if you are the gui type. Or simply use httpie , a command line for HTTP client. It is a CLI, cURL-like tool for humans.
Api links:
http://localhost:8100/api/tickets
http://localhost:8100/api/tickets/:id
http://localhost:8100/api/users
http://localhost:8100/api/login
That’s all for this article.
In the next article, we’ll be rewriting our serializers.py and viewsets.py. We’ll try to leverage the powerful feature of ModelSerializer.
Do check for updates for part 2. The repo can be found here.
If you enjoyed this article, Clap very well in order to push it to the world.